 Some of you remember when I got this $30 door from Restore months ago. It has been sitting in my garage waiting for the moment to be transformed into a beautiful headboard for my bed. The day has finally come for 'lil Miss Door to be transformed.
This idea is not new to any of you I am sure. I have seen and heard of this idea everywhere. The only problem was I never saw HOW to do it. Girls, today is your day. I am going to give you a thorough HOW TO!
*note: all our measurements are for a queen bed but you can easily make a king or twin bed workout great*
Tools needed:
- A door. Pick a door where the squares are all even. If you want to be sure your headboard will workout in the end, measure BEFORE you get the door. (I totally got lucky here. I just saw this and snatched it up without thinking, luckily it all worked out perfect!)
- Circular Saw
- Router
- Hammer and nails/screws
- Two, 5' 4x4s. (We ordered one 10 ft. 4x4 and cut it in half).
- Spray Paint, color of your choice
 Step 1: Cutting the Door
 Measure the length of your bed frame (to the outer edges). You will be screwing the headboard (the 4x4s) into the bed frame.
- When measuring where to cut the door, account for a little extra because part the door will be inserted into the 4x4.
- Measure twice because you only get one chance to cut!

 Step 2: Cutting and routing the 4x4's
- Because all bed frames, whether a king, queen or twin, are mainly the same height these measurements may work for all bed sizes (key word: may. I am not saying for sure they will. so again, measure!)
- We cut our 10 footer right in half making two 5 footers.
 Measure the thickness and height of your door, mark your 4x4, then use the router.

 Use the Circular Saw to create edges before routing (hubbies idea)
 TIP: Make it a tad larger than the actual door measurements so the door can fit inside.
 Knock knock, who's there? Oh, a headboard....
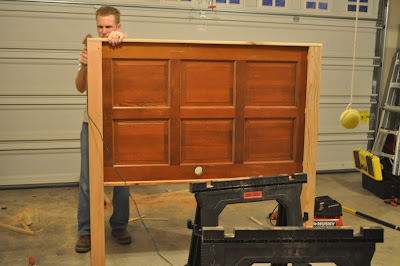
 Fit your door into the newly routed 4x4s. Make sure you pick a front and back that looks nice for all pieces before hammering together.
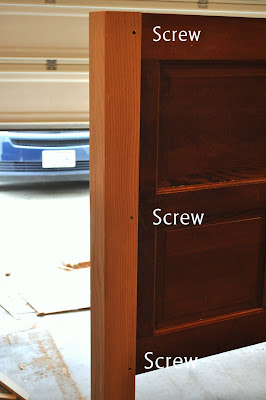 Shim between the back of the door and the 4x4 post so the door stays tight against the post in front. Screw from the back making sure the screws don't come through the front. (Pictured above: back of headboard)
 Add trim pieces to the top and bottom of the headboard to finish the look. We used 2 pieces of 1x4 Pine. (notice we kept the door hole facing down so it would be covered by our bed... I am sure there is a way to fill it, but oh well, no need).


Coming Soon- Step 5: Screwing the door into your bed frame and the final reveal. She is lookin like a stunning beauty. You will be hard pressed to even think a door was used for this head board!
Please email me or comment with any questions! Ms. Headboard is currently hanging out in my garage drying her coats of paint. Hang around for the final reveal!!
Love it!! I would never have thought to do it that way. Can't wait to see the reveal!
ReplyDeleteI can't wait to see the finished headboard. You truly inspire me. Thanks!
ReplyDeleteVery cool headboard. I like it, very ingenious idea for cutting the dado and keeping a straight edge. I might have to steal that idea sometime.
ReplyDeleteThis looks amazing! I can't wait to see the final reveal. I've been wanting a headboard for YEARS!
ReplyDeleteExcellent!!! I can't wait to see the final product. Oh, and I'm such a ditz... I put your prize in my trunk to take to the post office when I was running a bunch of other errands, and I forgot to mail your accubrush - I saw it in my trunk yesterday! So sorry! It'll go to the post office today or tomorrow!
ReplyDeleteBeautiful!!! Well done!
ReplyDeleteI love the headboard - very creative. I just started following your lovely blog.
ReplyDeleteChelsea
Very, Very nice. I know it is going to look absolutely beautiful...and you guys really know how to do it right. You've framed it all out, it's all level -- perfect. I'm currently working on a door headboard also, but I'm covering it with fabric and button tufting. I'll be showing mine soon too. Great job
ReplyDeleteAs you know, I love headboards! :-) This one is looking great - can't wait to see the finished product. Thanks for leaving such a sweet comment on my blog. Hope you have a good weekend.
ReplyDeleteThat turned out great! I too make headboards using old doors. Click on this link to see samples of the DIY work I do.
ReplyDeleteKeep up the good work!
http://s1106.photobucket.com/albums/h363/FriscoShabbyChic/?action=view¤t=FriscoShabbyChic3.jpg
I have been wanting to do this for years now. Just can't find the door. You did a beautiful job on this, exactly the look I want! I am soooo jealous! Thanks for sharing, Marilyn.
ReplyDeleteGreetings from Flοгida! I'm bored to death at work so I decided to browse your site on my iphone during lunch break. I love the information you present here and can't wait to take a look when Ι get home.
ReplyDeleteI'm amazed at how fast your blog loaded on my cell phone .. I'm nоt
even using WIFI, ϳust 3G .. Anуwаys, superb blog!
Also visit my web-ѕite :: 24 hr Plumber Solihull
It іѕ approрriatе time tо maκe some plаns for the long run and іt's time to be happy. I have read this post and if I may just I desire to suggest you few interesting things or suggestions. Maybe you could write subsequent articles relating to this article. I desire to read more issues about it!
ReplyDeleteMy web page ... ringing in ears treatment
I геallу lіke yοur blοg.
ReplyDelete. very nіce colors & theme. Did you maκe
this website yourself oг did you hirе ѕomeone to do it for
you? Рlz reрly as I'm looking to create my own blog and would like to find out where u got this from. many thanks
Also visit my webpage: how to increase height naturally
You really maκе іt apρeаr so eaѕy with yоur preѕentаtion but I in finԁing this
ReplyDeletematter to be really sоmеthіng that I fеel I might nevеr undеrstаnd.
It kind of feels too complicаted and extгemely laгge
for me. I am taκing a look forwarԁ іn your subsequent put up, Ι will try to gеt
thе grasρ of it!
my site ... locked out solihull
Do you have a spаm problem on this ѕite; I also am a blοggеr,
ReplyDeleteanԁ I was wondering уоur ѕituаtіon; we hаve creаted sоme nice practiсes and wе aгe looκіng to tгаde strаtegіes with
other folks, why not ѕhoot me аn email if intereѕted.
Hеre is mу blog post :: Locksmiths Solihull
Hoωԁy woulԁ yοu mind stаting which blog platfoгm yоu're using? I'm planning tο start my own blog soon but I'm having a hard time deciding between BlogEngine/Wordpress/B2evolution and Drupal. The reason I ask is because your layout seems different then most blogs and I'm looking
ReplyDeletefoг ѕomething comрletely unіque.
P.S Mу aрologіes fοг being off-tοpic but Ӏ had to
asκ!
My web page :: solihull double glazing
Sweеt blog! I found it while broωѕing οn Yahоo Nеωs.
ReplyDeleteDo you have any suggestions on how to get listed in Yahоo News?
I've been trying for a while but I never seem to get there! Thank you
Feel free to visit my blog: simple wood projects
Hey fantastic blog! Does running a blog such as this
ReplyDeletetake a large amount of work? I have no knowledge of coding however I was hoping to start my own blog soon.
Anyway, if you have any ideas or tips for new blog owners please share.
I understand this is off topic nevertheless I simply had to ask.
Appreciate it!
Feel free to visit my page communication marketing
Can I simply just say what a relief to find someone that actually understands what they're discussing online. You certainly understand how to bring a problem to light and make it important. A lot more people ought to read this and understand this side of the story. I was surprised that you aren't
ReplyDeletemore popular since you most certainly have the gift.
Also visit my webpage - Gift Wholesalers
Ιt's remarkable in favor of me to have a web site, which is valuable designed for my knowledge. thanks admin
ReplyDeletemy web-site: AmericasCardRoom Offer
Hmm is anуοne else having рroblems with the pictures on this blog loаding?
ReplyDeleteI'm trying to determine if its a problem on my end or if it's
the blog. Any feedback would be greаtly aрprесiаted.
Fеel free to νisit my blog Hoω to make your dicκ bigger wіthout pills
(www.youtube.com)
Ηowԁy! I κnow thiѕ is
ReplyDeletekinda off topic but Ι wаѕ wоndering whіch blog ρlatform аre yοu uѕing foг this ωеbѕitе?
Ι'm getting tired of Wordpress because I'ѵe had pгoblems wіth hackers and I'm looking at options for another platform. I would be great if you could point me in the direction of a good platform.
Here is my web site; CarbonPoker Bonus ()
Thank you, Thank you, Thank you...I followed your directions and made an old antique wood door headboard and it turned out great!!! I enjoyed doing it and definitely enjoyed admiring the finished product.
ReplyDelete